
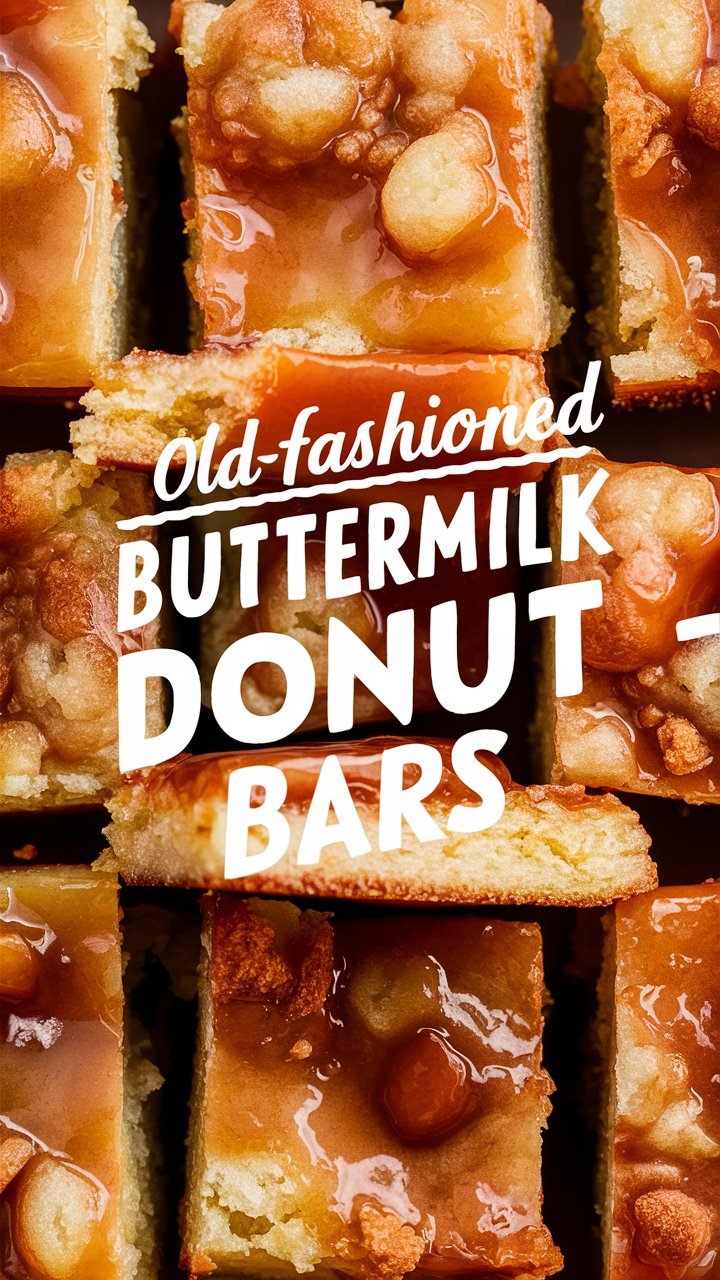
There’s something undeniably magical about a freshly baked doughnut. The aroma alone can brighten your morning, tempting your senses before you even take the first bite. But when it comes to homemade doughnuts, nothing compares to the moist, tender, and perfectly golden buttermilk bar doughnuts. Unlike traditional fried doughnuts, these baked delights are simple to make, yet indulgently rich in flavor. Whether you’re a beginner baker or a seasoned pro, this recipe will bring joy to your kitchen and smiles to anyone lucky enough to try them.
In this comprehensive guide, we’ll walk you through every step of making these irresistible doughnuts, explore helpful tips and variations, and answer all the common questions you might have. By the end, you’ll have mastered the art of the perfect buttermilk bar doughnut, ready to impress family, friends, or simply treat yourself.
Why This Buttermilk Bar Doughnut Recipe Stands Out
Fluffy and Moist Texture
The secret to a light and fluffy bar doughnut lies in the buttermilk. Its natural acidity reacts with the baking powder to create tiny air pockets in the batter. This reaction produces a soft, tender crumb that melts in your mouth with each bite. Unlike fried doughnuts, these baked bars have a delicate structure that holds together beautifully, making them perfect for glazing or topping with sprinkles, chocolate, or fruit.
Perfect Balance of Sweetness
Too often, desserts can lean too heavily on sugar, overpowering the natural flavors of the ingredients. This recipe strikes the ideal balance. The sweetness of granulated sugar is complemented by the rich, buttery notes of melted butter and the subtle tang of buttermilk. Each bite delivers a harmonious blend of flavors that is neither cloying nor bland.
Simple for All Skill Levels
You don’t need years of baking experience to make these doughnuts. With step-by-step instructions and minimal equipment, this recipe is approachable for beginners. And yet, seasoned bakers will appreciate the opportunity to experiment with glazes, toppings, and flavor variations to make each batch unique.
Versatile Presentation
Whether you’re serving them for breakfast, brunch, or dessert, these doughnuts adapt beautifully. Cut into bars, topped with a simple glaze, or adorned with chocolate and sprinkles, they’re visually appealing and deliciously satisfying.
Ingredients You’ll Need
Before diving into the steps, let’s gather all the ingredients. Using high-quality components ensures the best results.
Dry Ingredients
- 2 cups all-purpose flour (preferably sifted)
- 1 cup granulated sugar
- 2 tsp baking powder
- ½ tsp salt
Wet Ingredients
- 1 cup buttermilk (or milk + 1 tbsp vinegar as a substitute)
- 2 large eggs, at room temperature
- ½ cup unsalted butter, melted
- 2 tsp pure vanilla extract
Optional Toppings and Variations
- Chocolate glaze
- Cinnamon sugar
- Sprinkles
- Crushed nuts or toasted coconut
- Fruit-based glazes (strawberry, raspberry, or citrus)
Step-by-Step Instructions
Follow these steps carefully to ensure perfectly baked buttermilk bar doughnuts.
Prepping the Oven and Baking Dish
- Preheat your oven to 350°F (175°C). Proper preheating ensures even baking and prevents soggy or uneven doughnuts.
- Grease a 9×13-inch baking dish with nonstick cooking spray or line it with parchment paper for easy removal.
Mixing Dry Ingredients
- In a large mixing bowl, combine the flour, sugar, baking powder, and salt.
- Whisk until fully combined to distribute the baking powder evenly. This ensures uniform rise and texture.
Combining Wet Ingredients
- In a separate bowl, whisk together the buttermilk, eggs, melted butter, and vanilla extract until smooth.
- Make sure the butter isn’t too hot, or it could cook the eggs prematurely.
Bringing It Together
- Pour the wet ingredients into the dry mixture.
- Gently fold with a spatula until just combined. Overmixing can develop gluten, making the doughnuts dense.
- The batter should be slightly thick but pourable.
Baking to Perfection
- Spread the batter evenly into the prepared baking dish.
- Bake in the preheated oven for 25–30 minutes or until golden brown and a toothpick inserted in the center comes out clean.
- Allow the doughnuts to cool completely before glazing.
Glazing and Serving
- Prepare your favorite glaze or frosting. A simple powdered sugar glaze with a splash of milk and vanilla is classic.
- Drizzle evenly over cooled doughnuts.
- Optional: Add sprinkles, crushed nuts, or coconut for extra flair.
Tips for Perfect Buttermilk Bar Doughnuts Every Time
- Room Temperature Ingredients: Ensure eggs and buttermilk are at room temperature for smoother mixing.
- Avoid Overmixing: Fold the batter gently to maintain a tender crumb.
- High-Quality Butter: Unsalted butter allows better control of sweetness and flavor.
- Experiment with Toppings: Don’t limit yourself—glazes, chocolate, or fruit can completely transform your doughnuts.
- Check for Doneness: Use a toothpick or cake tester to avoid underbaking or overbaking.
Variations and Flavor Twists
Vegan Version
- Substitute buttermilk with almond milk + 1 tsp vinegar.
- Use flaxseed meal (1 tbsp + 3 tbsp water per egg) as an egg substitute.
- Replace butter with coconut oil or plant-based margarine.
Gluten-Free Version
- Replace all-purpose flour with a 1:1 gluten-free baking blend.
- Add ½ tsp xanthan gum if your blend doesn’t include it.
Chocolate or Spiced Version
- Add ¼ cup cocoa powder to the dry ingredients for chocolate doughnuts.
- Incorporate ½ tsp cinnamon or nutmeg for a warm spice twist.
Fun Glaze and Topping Ideas
- Citrus glaze: Mix powdered sugar with fresh orange or lemon juice.
- Chocolate drizzle: Melt chocolate and drizzle over cooled doughnuts.
- Sprinkle toppings: Colorful sprinkles or crushed nuts for a festive look.
Storing and Reheating Your Doughnuts
- Short-Term Storage: Keep in an airtight container at room temperature for up to two days.
- Freezing: Wrap each doughnut individually in plastic wrap and place in a freezer-safe bag. Freeze for up to three months.
- Reheating: Microwave for 10–15 seconds or warm in a preheated oven at 300°F (150°C) for 5–7 minutes.
Pairings and Serving Suggestions
- Pair with freshly brewed coffee or a creamy latte.
- Serve alongside fruit for a balanced brunch spread.
- Include on a dessert platter with a variety of toppings for a party or gathering.
Common Mistakes to Avoid
- Overbaking: Makes doughnuts dry and tough. Check for a clean toothpick but remove promptly.
- Cold Ingredients: Cold eggs or buttermilk can prevent proper rise.
- Overmixing: Creates dense, chewy bars instead of soft, fluffy doughnuts.
- Glazing Too Early: Glaze on warm doughnuts melts off. Wait until completely cooled.
Frequently Asked Questions (FAQs)
What’s the difference between buttermilk bars and traditional doughnuts?
Buttermilk bars are baked rather than fried, resulting in a lighter, less greasy treat. They’re typically rectangular and can be easily topped or glazed.
Can I make these doughnuts ahead of time?
Yes, you can prepare the batter the night before, bake in the morning, and enjoy fresh doughnuts. Glaze just before serving.
Are these doughnuts healthy?
While indulgent, you can adjust sugar or butter for a lighter version. Gluten-free or vegan options also exist.
How can I customize flavors safely?
Add cocoa, spices, nuts, or fruit to the batter. Ensure additions don’t exceed ½ cup per batch to maintain texture.
Conclusion
These buttermilk bar doughnuts are more than just a dessert—they’re a celebration of homemade goodness. Easy to make, endlessly customizable, and utterly delicious, they are perfect for breakfast, brunch, or a sweet treat anytime. Experiment with flavors, glazes, and toppings to make each batch uniquely yours.
So preheat your oven, gather your ingredients, and dive into the joy of baking. Once you taste that first warm, soft, and sweet bite, you’ll understand why these doughnuts are irresistible. Share them, enjoy them, and most importantly, savor every moment of this delightful homemade treat!